There’s not a single “right way” to see the system that is causing problems. It’s critical to understand that identifying and understanding a problem does not mean applying a certain number of tools in a certain order. Rather, your team must embrace a systems perspective and use the tools best matched to your context and need. Below we share with you how to use two tools that have helped districts in our work better understand the system and root causes to various problems of practice.
Developmentally Appropriate
A play-based approach focused on each child’s strengths to support development and optimal learning
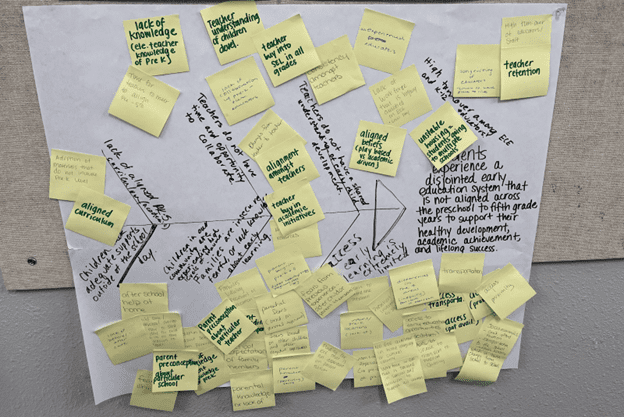
Activity: Root Cause Analysis Using a Fishbone Diagram
Time: 60 minutes
Materials:
- In Person: several pads of sticky notes, whiteboard or chart paper, pens, sharpies
- Digital: Mural, Google Jamboard, or Microsoft Teams whiteboard
People: Experienced facilitator and Early Learning team members
Process:
10 min: Writing a problem statement – The team should write a problem statement, free of embedded solutions and free of blame. Naming a big, thorny problem often proves challenging for educators who are optimistic and action-oriented by nature. A strong facilitator can help narrow and clarify the problem and help to omit solutions and blame.
10 min: Individual Brainstorming – Once the problem is clearly identified, write it on a fishbone template at the mouth of the fish. Now team members are ready for some individual brainstorming, identifying root causes of the problem. Before starting this activity, it is helpful for team members to see examples and non-examples. Clear examples are very specific and blame-free.
Example Problem Statement:
Parents in our community are unaware of the neurological benefits of early learning programs.
Non-Example:
Why doesn’t our community support early learning?
30 min: Creating the Fishbone – After individuals have finished naming root causes, a facilitator brings the team back together to share and sort root causes on the fishbone template. This process is efficient and inclusive when one team member reads one of their root causes aloud and places it on the fishbone. Other team members are invited to share a root cause that is similar to the one just shared, placing the similar root cause next to the original on one bone of the fishbone. Similar root causes are clustered, then a new person is invited to share one new root cause, and the process repeats until all root causes are shared. Throughout the process, the facilitator invites team members to rewrite their root causes in real time if they have written a question instead of a problem, or if the problem is broad enough that participants can ask, “Why is that a problem?” and drill deeper into root causes. Once all root causes are on the fishbone, the group takes a step back to see if the root causes are clustered in ways that make sense, and can make any needed adjustments.
10 min: Headlining & Focus Bone – The next step in identifying the problem is to develop a headline for each bone on this fishbone. The headline should be a descriptive phrase or sentence summarizing the ideas represented on the sticky notes of each bone. Finally, the team selects a focus bone: an issue they want to address first. Once this process is completed and root causes have been clearly identified and agreed upon, the team is ready to consider perspectives that might be missing.
Notes & Tips:
- Identify each root cause on a separate sticky note, or the virtual equivalent
- Take high-resolution photos of the fishbone for later reference

Empathy Interviews
Now that the team has deeply unpacked the problem they’re trying to solve, it’s time to consider other perspectives. The team should ask, “What might the stories of those who are most impacted by this problem help us to understand about the root causes?” The team should consider the perspectives of children, families, and community members, especially those who have been underserved and underrepresented. Empathy interviews are one method of engaging others to weigh in on the problem. Empathy interviews are a process of listening to and taking steps to understand the perspectives, feelings, and experiences of other people. The goal is not just to better understand the problem, but to connect with individuals experiencing the problem and use their experiences and wisdom when developing a solution.
Tools:
Our colleagues at Community Design Partners wrote a fantastic article in Learning Forward about empathy interviews that will help teams understand the purpose and prepare for the process. Read it here.
In advance of empathy interviews and observations, we recommend setting up a central data collection tool such as Google Forms. A central system will make later analysis of empathy data much easier. Here is an example Empathy Analysis Spreadsheet.
Empathy Observations
If the root cause you are addressing requires gaining empathy for young children, empathy interviews may not be the most developmentally appropriate practice for better understanding their strengths and needs. Unfortunately, in our society, young children are not often treated with respect, and their voices are not often included in problem-solving. Young children, however, are quite capable of communicating complex ideas and sharing their thoughts if the structure and format for their participation are developmentally appropriate*.
When observed in their natural context using a semi-structured protocol, young children are more likely to demonstrate to you what they might be thinking, or to display behaviors and emotions that can help you acknowledge and design solutions to better meet their needs.
Activity: Empathy Observations Protocol
Adapted from this Empathy Field Guide from the Hasso Plattner Institute of Design at Stanford
Time: 20 minutes
Materials:
- In Person: journal for note-taking, paper and marker/crayon/colored pencil for the child to draw
- Digital: not recommended
People:
- At least one adult who has a relationship with the child; this can be in partnership with a family or community member. Having more than one observer will help you attend to implicit or confirmation bias.
- A three- or four-year-old child whose needs are not currently being met by the system
Purpose: To gain insights into the experiences and perspectives of a young child in order to more effectively design early learning environments and solve problems the child is experiencing.
Process:
During a quieter moment in the day, or in a space separate from the classroom, invite the child to draw.
The drawing is the method by which you are asking the child to think about a memory, to think about a plan, or to think about how they feel about a particular topic.
Example: If your empathy question for adults was, “Tell us about the best time you’ve collaborated with someone,” you might ask the child, “Can you show me where you feel really comfortable? Where is your favorite place to be?”
While the child is drawing, use the following prompting questions:
- Tell me more about this… (point to drawing)
- Why is it that…?
- How come…?
- Can you say more about…?
While the child is drawing, write notes:
- Write down the exact words they are saying
- Write the manner in which the child is sharing with you (Are they excited? Solemn? Moving slowly and carefully?)
- Collect the work sample or take a photo
Notes & Tips:
- While drawing can be a great way to make a connection with the child, children may be able to express their ideas and thinking with different materials. For example, if you know a child tends to build things with Legos, uses blocks, likes to paint, or prefers imaginative role-playing, these are all different activities that can replace drawing.
- If we observe students with average experiences in our system, we risk confirming what we already know. If we observe students who are currently and historically marginalized by the system, we can learn new insights to improve the system for all children.
Analyzing Empathy Interview Data: Headlining and Theming
Once empathy interviews and observations are complete, it’s time to review the data collected across interviews by each question. Teams, with the help of an experienced facilitator, then pull out the headlines across the interview notes.
Headlines are typically phrases that represent key ideas, feelings, or insights. Each idea should have its own headline and be grounded in interview data. For example, interviewers might ask several children, “Tell me about starting a new grade.” Headlines across interviews might include “forming friendships” and “nervous to start.”
Once all responses are headlined, the team uses a process such as color-coding to establish patterns, or themes, in the data. After all of the data has been color-coded, like headlines are grouped together and a theme statement is developed. For example, the headlines “understands and likes letters and numbers,” and “learned letters and numbers from teacher; practices with Alphafriends,” are themed, “Students learn through instruction and practice.”
Needs Statements
After establishing themes, each theme should be flipped into a needs statement. For example, the theme “Students learn through instruction and practice,” is converted into, “Students need opportunities to practice, to experience engaging instruction, and to demonstrate their learning.”
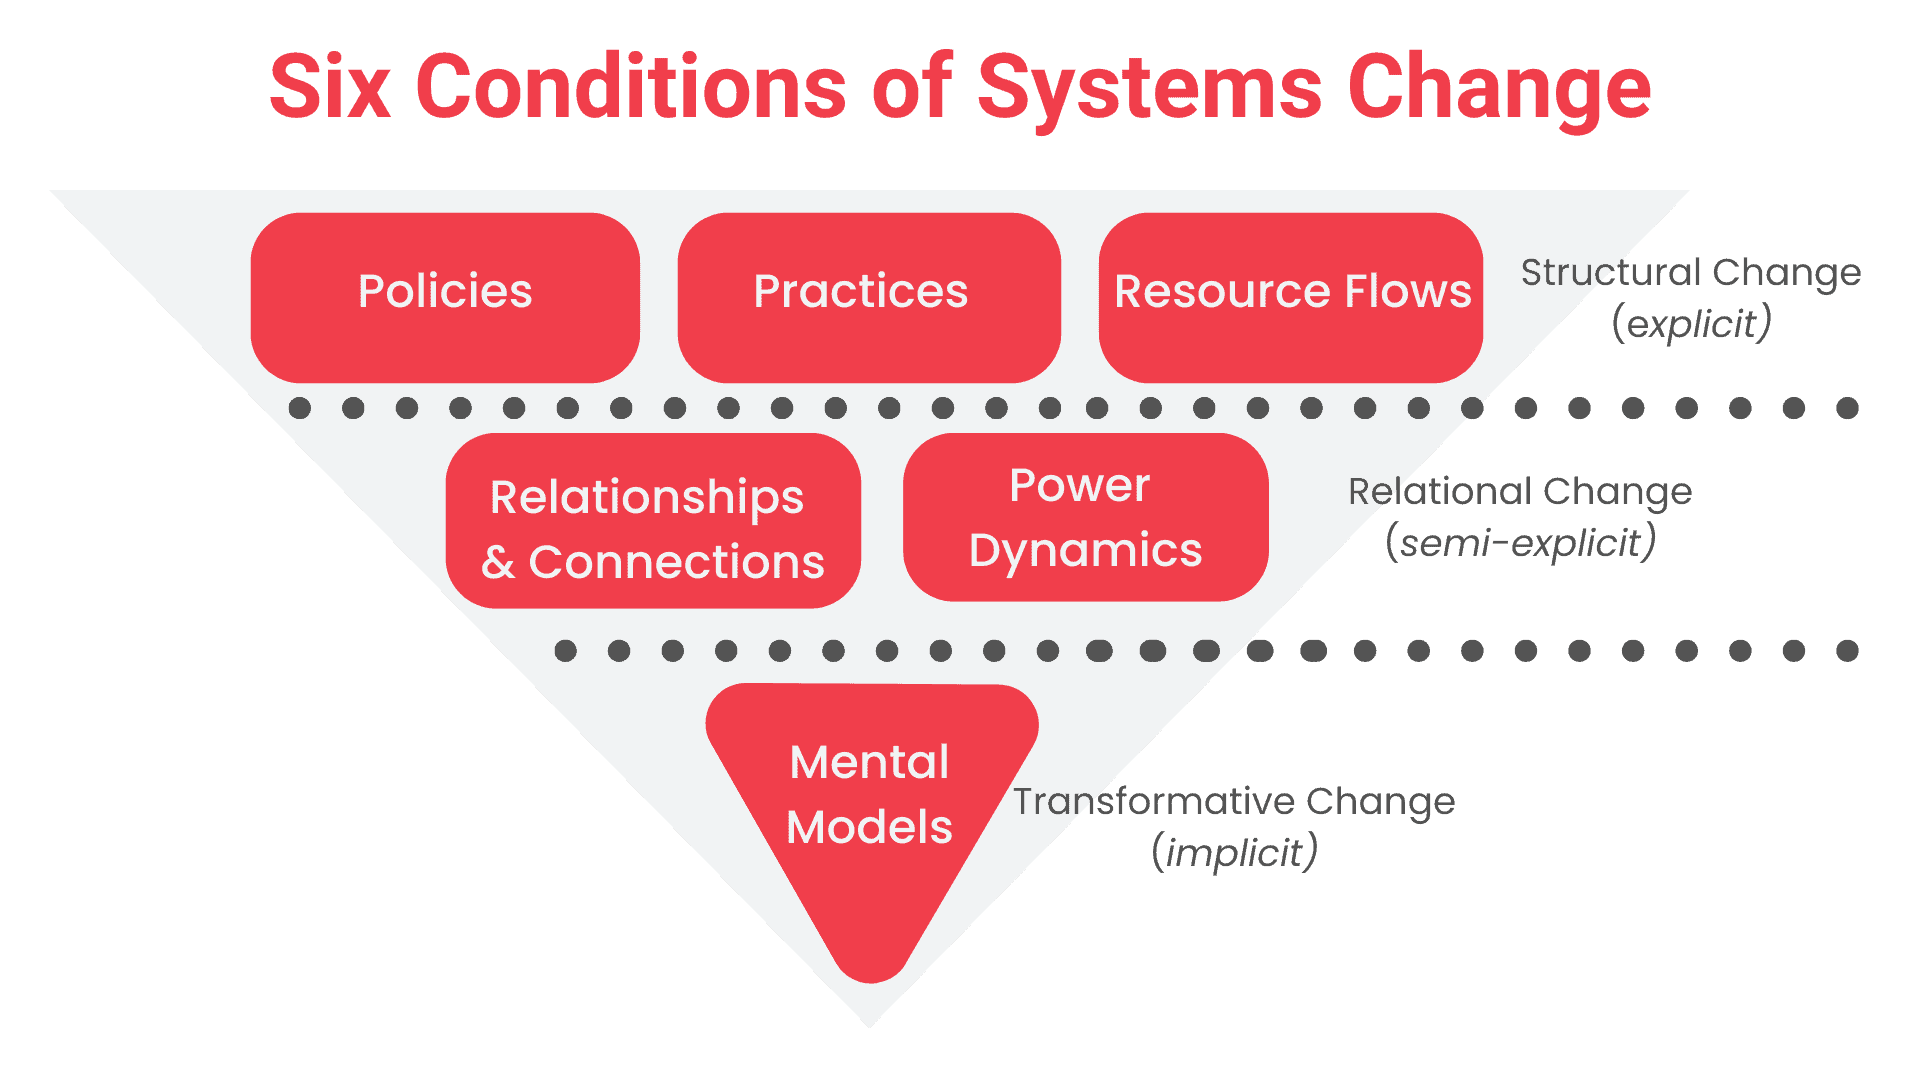
The final step of this process is to map the needs statements back to the theory of improvement and where in the system the need might be best addressed. A common error when making change is to work solely at the structural level. Being aware of needed and intentional shifts in relationships, power dynamics, and beliefs will ensure that changes are an improvement and not just different.

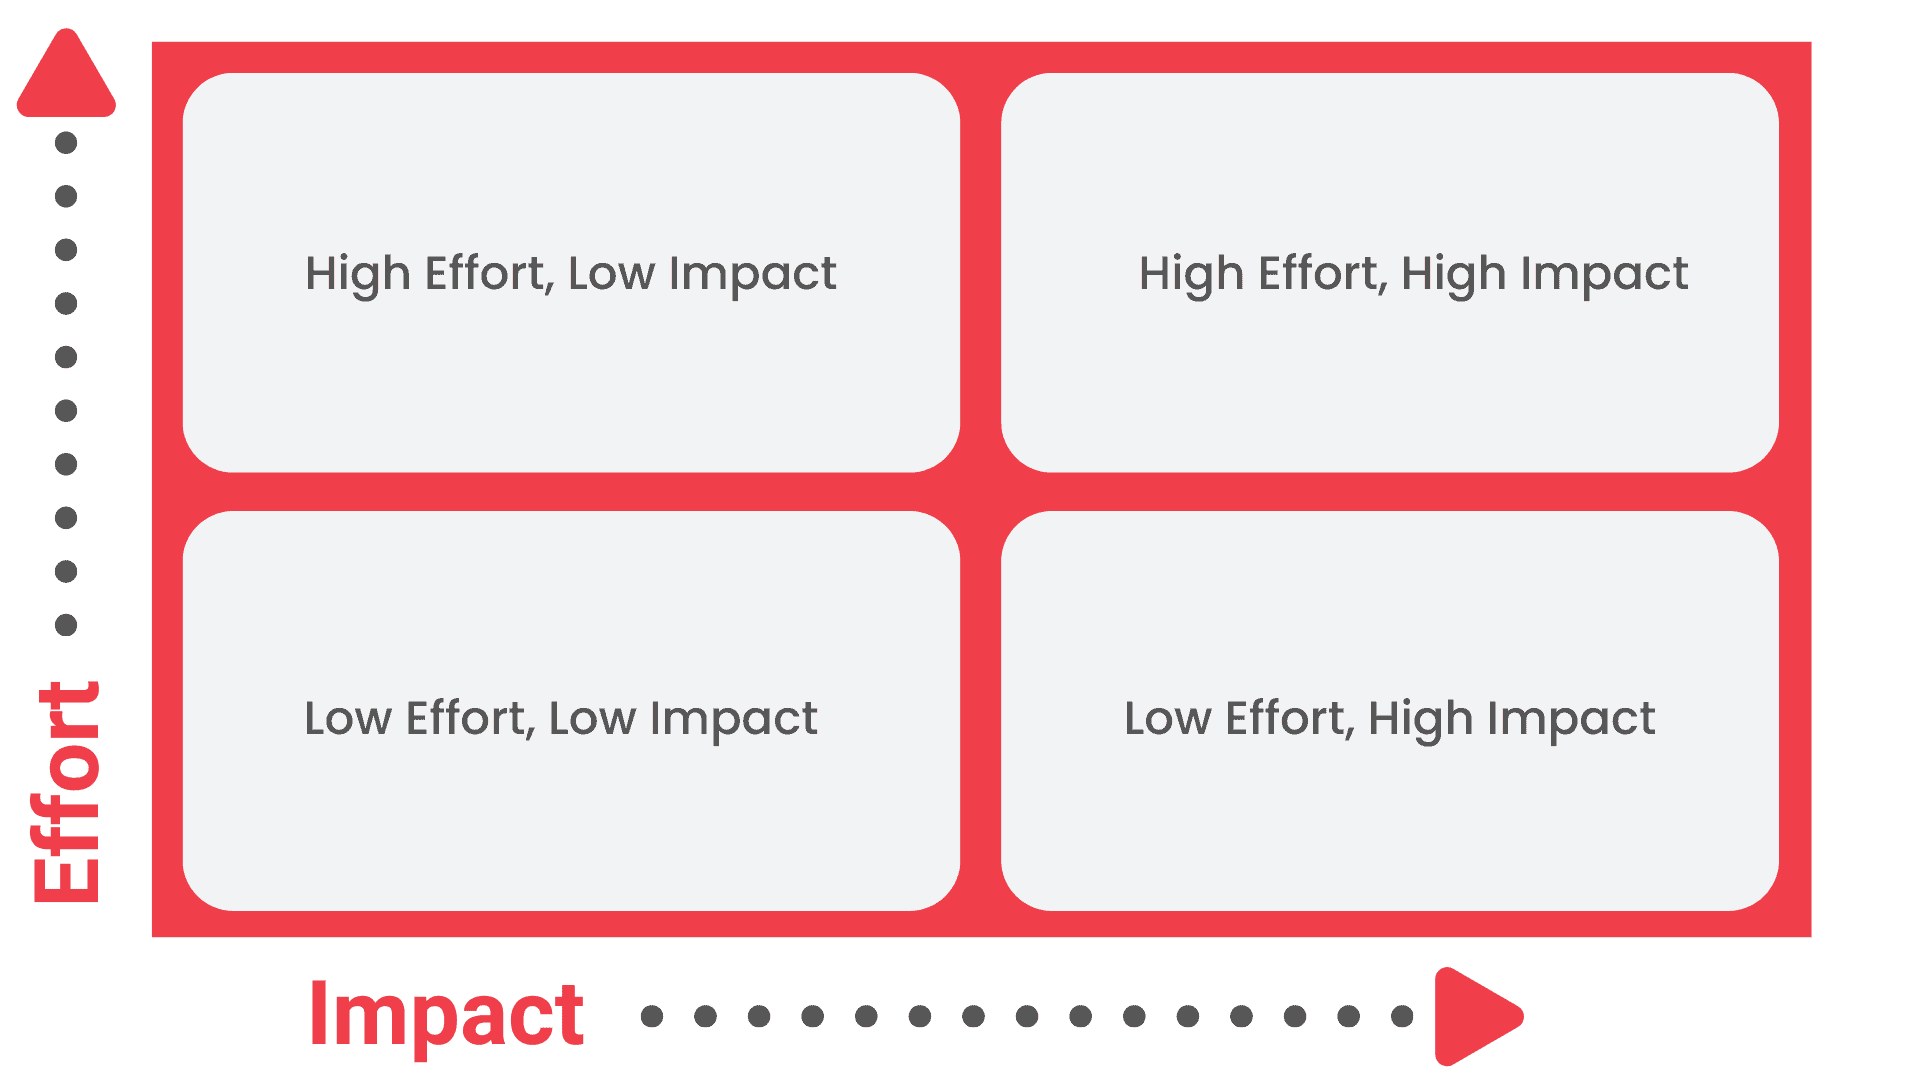
As a team, use a structured process to determine which improvements to focus on first. One structure that is helpful to make this determination is to use an Effort/Impact Matrix.

Team members place dots on the matrix to determine the impact and effort involved in addressing each need, and start with the highest impact, lowest effort need. Another simple structure is to allot a certain number of stars (high priority) and hearts (important) to each team member and allow them to vote on the needs they would like to address by placing their stars and hearts on a chart.
